

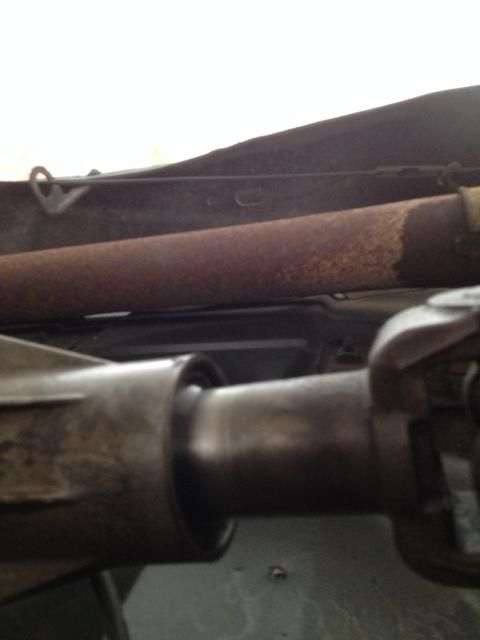
The rear output of my transfer case was leaking badly, and in more than one way. The seal was leaking,
![Image]()
but so was the yoke itself.
![Image]()
Not just a little either, every time I parked it after driving it would dump a puddle at least 8" in diameter. Who knows what was coming out while I was still driving!
I looked all over the googles and the interwebs and couldn't find a writeup, or even any decent photos of what to expect when undertaking this task. Based on the military TM, you'd think the only way to service the transfer case is a complete rebuild! It's way easier, and won't take more than half a day if you have your parts in advance. This is a low three banana job, but only because you need a seal driver kit, a temp-fab tool, a torque wrench, and some RTV. If you're just doing the seal, it's barely two bananas.
You'll need (seal only):
-seal (GM part# 8625893)
-screwdriver
-seal driver
-torque wrench (25 ft.-lbs. for pretty much everything here save the speedo retainer which is 10 ft.-lbs.)
-clean rags
To reseal the yoke, you'll need (in addition to the seal kit) plus:
-brake cleaner
-small metal brush for cleaning
-slow setting runny epoxy that can handle oils and temperature
-thin masking tape
-something for mixing/epoxy distribution
-something from which to hang the driveshaft
-a small bastard file or maybe a razor blade
To replace the bushing while you're in there (and you might as well do it right and be done with it), you'll need all of the above (maybe not the yoke part if that's not an issue for you) plus:
-bushing (GM part# 15665313) - I had to get this from a transmission shop because the FLAPS (Friendly Local Auto Parts Store) bushing was the wrong size
-RTV (I prefer "The Right Stuff" by Permatex; it's more expensive, but you get more of it and it's clean, easy, keeps better than the stuff in the metal tubes, and most importantly IT WORKS)
-a thickish piece of flat scrap steel
-a fairly long bolt that will fill the hole in your seal driver and some washers to go with it (this will be explained below)
-deadblow hammer
-oil pan
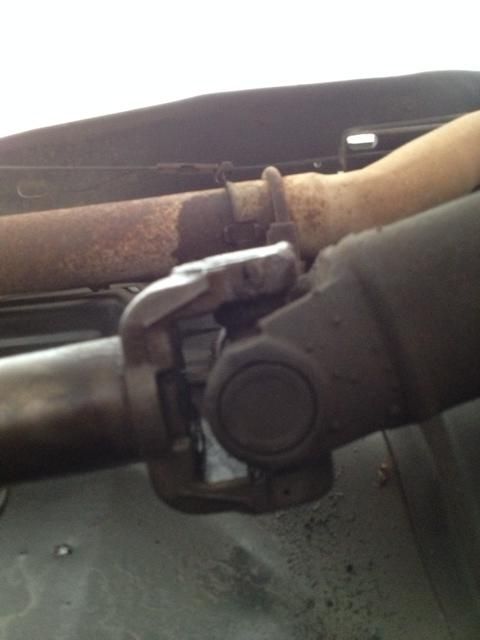
The first thing you do is undo these bolts:
![Image]()
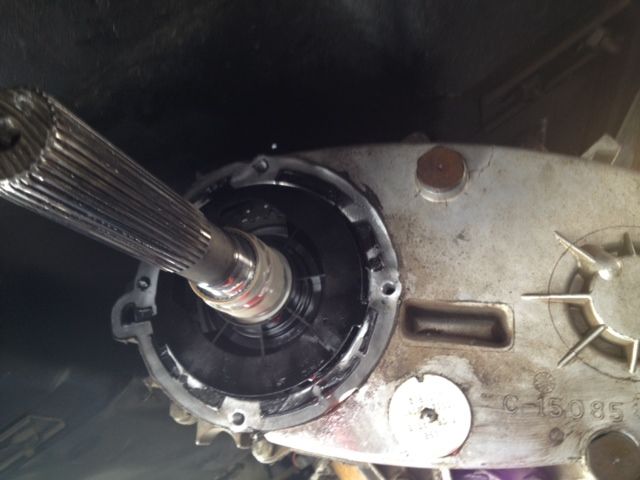
Then raise or lower the driveshaft to clear the diff, and pull it out of the rear extension housing:
![Image]()
It'll slide out easy peasy.
If your yoke is leaking, it's probably a bit of a mystery as to how. The yoke starts as a steel tube, and it has splines machined into it to mate with the output shaft in the transfer case. They can't just leave it as an open tube, because every time the suspension cycles the yoke sliding on the output shaft will act as a piston and squirt transfer case fluid everywhere. To keep this from happening, they pressed a steel disc into the end of the tube and rolled a lip over it to seal it. Drivetrain parts live a hard life, and things can cause the yoke to deform a bit over time. Sometimes, your truck may have had a previous life in the orangutan exhibit at the zoo, and orangutans don't like leaks either (most of the time). The only tools orangutans know how to use are hammers, adjustable wrenches, and RTV, so they seem to just beat on it and grunt until it leaks more and they give up. At this point, they might smear RTV on it, and go fling poo at things hoping it doesn't leak any more. This is what my previous owner did, and as a result, it was leaking quite badly. The correct fix is to buy a new slip yoke, but a tranny shop suggested giving this a try, and it seems to have worked. Since it's cheaper than a new yoke, easier to find, doesn't require waiting for shipping, and a nice way to prolong the life of existing parts, here's how you fix it:
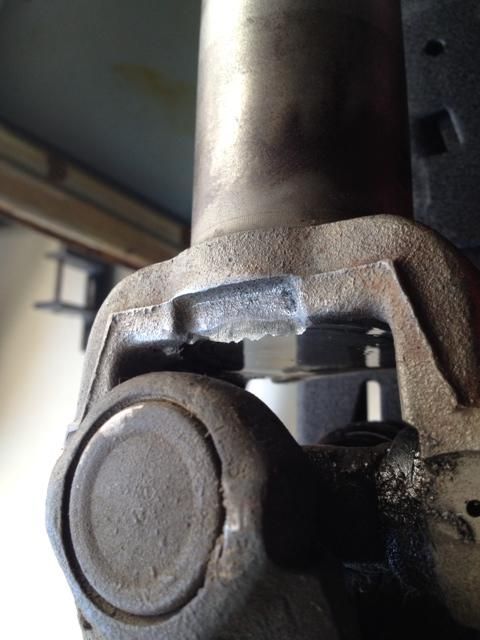
Hang the driveshaft from the rear u-joint so that the yoke points down. It'll probably still be dripping a little transmission fluid, so toss a rag or something down there to keep the floor clean. I hung mine from one of the pallet racks I use to store parts for my other cars using some large zip ties slung under the arms of the u-joint and hung over the top of the vertical of the shelf (I tried to take a picture, but my phone has developed a nasty habit of not saving the pictures I take for some unknown reason). The pressed in disc is under the u-joint. It's going to be hard to get at, but you can do it without disassembling everything. Clean the crap out of it; so clean that masking tape will stick to it and hold. This is important for a few reasons. The epoxy needs to hold, and masking tape is necessary to give the epoxy a wall and allow it to build a thick enough cap to make up for things not being perfectly level. When it's clean enough, you'll notice a shoulder toward the center of the yoke that is level with the pressed in disc (look at the photo below); this is where the tape needs to go to give the epoxy some space to build in case you weren't able to get the yoke to hang perfectly level. The way this whole trick works is that the epoxy seeks level, and so flows into all the cracks and such in addition to any surface adhesion. It fills everything, and prevents further fluid leakage. It's held up for a few miles now, so I'm cautiously suggesting it could fix the issue. With the tape in place, mix your epoxy and deposit it over the plate. There needs to be enough to completely cover it, but you obviously don't want epoxy spilling all over the place.
This is an after photo, but before it was cleaned up... Same phone issue as before.
![Image]()
While the epoxy is curing (you'll want the 30 minute stuff), go do the rest of the job, but for continuity's sake once the epoxy is cured, you'll take the file or razor blade and clean up the lip from the tape. Then it's ready to go back in the truck.
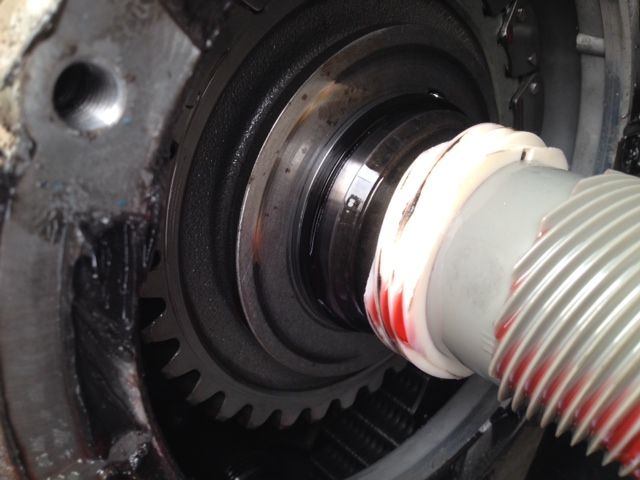
Meanwhile, back at the Hall of Justice, if you're just replacing the seal (and you should really do the bushing too, but just in case) you don't want a seal puller. I didn't realize how the seal was in there (didn't look too closely at the new one I guess), and spent a lot of time messing with it in the wrong way.
![Image]()
That red line is a lip where the metal cladding of the seal extends beyond the rear extension housing; just put the blade of a screwdriver behind it and tap it out with everything (save the drive shaft) still in the truck. No biggy. If that's all you're doing, put the new one in with a seal driver. A seal driver kit can be had for as little as $20, or you can usually rent one for free (with a deposit) from your favorite FLAPS.
If you're going all the way (I call it "doing it right"), you'll need to continue reading. At this point (since we're finally getting to the subject of the bushing), it is very much worth pointing out that the bushing I found at ALL the FLAPSes was wrong. The OD should be 2.01(something), but the OD on the bushings everyone was selling was 1.9(something) and just fell right through the housing. It's possible it's a model year thing. O'Reilly's website lists the part compatibility as being "82-88*", with the asterisk being "except '83". My truck is an '84 M1009, and the government's CUCV contract started in '83 (typically parts must be compatible across the entirety of the contract), and the date code cast into the housing was mid-'80. It's possible I just ordered the wrong bushing, though there were none listed for '83 or '80. I went to A-1 Transmissions down in Denver, and the guy said it was just the bushing for the TH400 for the larger gas engines. He gave me the bushing, two seals (my yoke is borderline on the sealing surface), a breather fitting so I can attach a line for water crossing, cleaned up the sealing surface, and installed the whole lot into the rear extension housing for $20; all with a smile.
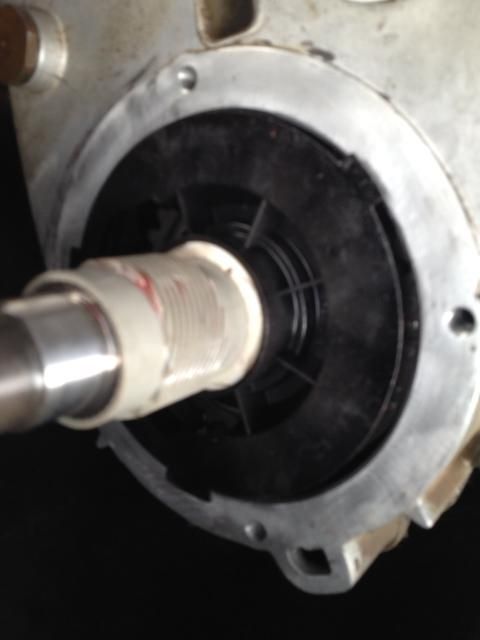
First, if your transmission fluid is new(ish) and you want to save it, thoroughly clean out your oil pan and clean off the transfer case housing pretty much everywhere you can possibly imagine the fluid running from the bottom of the rear extension housing. Otherwise, you'll start by removing the speedometer cable
![Image]()
and speedometer gear housing retainer bolt (I believe it's 10mm). It's found on the PS top of the rear extension housing.
![Image]()
Put the cable out of the way somewhere, and the housing somewhere nice as well (you don't want to mess up that o-ring if you don't have to).
Next, take a 15mm socket and remove the rear extension from the transfer case. Unless you've already drained the fluid for a fluid change or something, have an oil pan ready to catch some transmission fluid.
The bolts are at the four corners of the circular housing. Up here by the speedometer stuff:
![Image]()
Opposite that on the top:
![Image]()
And then the two obvious ones on the bottom:
![Image]()
It may take some convincing with a deadblow if the sealant is newish, but it will ultimately just slide off:
![Image]()
Once you get it off, take a second to look around and familiarize yourself with what's going on. Understanding the beast goes a long way toward knowing what it needs to stay happy.
![Image]()
Most of what you'll see initially is just the pump housing. It will just slide right off (and may have come at least partially out with the rear extension housing).
Back side of the pump with its seal:
![Image]()
Pump guts, speedometer gear (both will just slide off the splines if you're curious, but be sure to put them back on in the same orientation), and sprocket/retainer/etc.
![Image]()
I feel pretty certain the reason for the orangutan abuse of my slip yoke was that it a) leaked quite badly after a botched u-joint replacement and b) was subsequently run completely out of fluid. As a result, I found a ring of what I believe to be friction welded metal shavings between the pump housing and the sprocket retaining hardware. It never hurts to have a look around.
Take the housing over to your work bench, and if you've gone this far, you probably didn't mess with pulling the seal in the truck (why bother?); pull the seal. The bushing is sort of difficult to get at. If you knock it in from the top, the bearing wont let it through, and you can't exactly get a seal driver through the bearing either. I ended up knocking the bearing out, and that gave me full access to the bushing (btw, this is another point where my camera took many pictures that it promptly forgot taking). It's difficult to get at from the back because it's so deep, and I was concerned about the soft aluminum housing not taking a beating very well. I messed with it for a bit before settling on the following solution: I found a long enough bolt, two washers, a nut, and the appropriate sized bearing driver, then grabbed a bar of 1/8" flat stock out of the scrap pile that was wider than the small end of the rear extension housing. I drilled a hole to fit the bolt in the flat stock, then assembled the mess into a simple bearing puller. It came out much easier than the seal did.
This is the only picture that saved, but I think it should be pretty apparent what I'm getting at. If anyone needs further illustration, I'll see if I can't reassemble it.
![Image]()
From here, it's all but the reverse of assembly. Drive the new bushing in (and debur it if necessary), install the new seal, and drive in the bearing. Clean up the mating surfaces between the transfer case and the rear extension housing. Note that there are notches in the rear extension housing that mate up with indexed tabs on the pump housing:
![Image]()
![Image]()
If you don't pay attention to this, reassembly could get a little messy or you could end up with the housing not fully seated or off kilter depending on how the tabs were indexed. I imagine it's even possible to break the pump housing tabs off since they're just plastic.
Put your RTV on the rear extension housing, then roll under there on your creeper and slide it all back together. The bolts are torqued to 25 ft.-lbs. Reinstall the speedometer stuff and torque the retainer bolt to 10 ft.-lbs. (you may consider doing this last if you'd rather not reset your torque wrench multiple times). By now, the epoxy has cured on the yoke, so go get it and slide the driveshaft back home, mate it to the diff, and torque those to 25 ft.-lbs. Go clean up the shop, maybe have a beer, walk the dog, what have you to give the RTV a few minutes to set up (it says it's ready to go back into service immediately, but I like to play it safe), then replace the transmission fluid (filter it first if necessary) and you're done!
but so was the yoke itself.
Not just a little either, every time I parked it after driving it would dump a puddle at least 8" in diameter. Who knows what was coming out while I was still driving!
I looked all over the googles and the interwebs and couldn't find a writeup, or even any decent photos of what to expect when undertaking this task. Based on the military TM, you'd think the only way to service the transfer case is a complete rebuild! It's way easier, and won't take more than half a day if you have your parts in advance. This is a low three banana job, but only because you need a seal driver kit, a temp-fab tool, a torque wrench, and some RTV. If you're just doing the seal, it's barely two bananas.
You'll need (seal only):
-seal (GM part# 8625893)
-screwdriver
-seal driver
-torque wrench (25 ft.-lbs. for pretty much everything here save the speedo retainer which is 10 ft.-lbs.)
-clean rags
To reseal the yoke, you'll need (in addition to the seal kit) plus:
-brake cleaner
-small metal brush for cleaning
-slow setting runny epoxy that can handle oils and temperature
-thin masking tape
-something for mixing/epoxy distribution
-something from which to hang the driveshaft
-a small bastard file or maybe a razor blade
To replace the bushing while you're in there (and you might as well do it right and be done with it), you'll need all of the above (maybe not the yoke part if that's not an issue for you) plus:
-bushing (GM part# 15665313) - I had to get this from a transmission shop because the FLAPS (Friendly Local Auto Parts Store) bushing was the wrong size
-RTV (I prefer "The Right Stuff" by Permatex; it's more expensive, but you get more of it and it's clean, easy, keeps better than the stuff in the metal tubes, and most importantly IT WORKS)
-a thickish piece of flat scrap steel
-a fairly long bolt that will fill the hole in your seal driver and some washers to go with it (this will be explained below)
-deadblow hammer
-oil pan
The first thing you do is undo these bolts:

Then raise or lower the driveshaft to clear the diff, and pull it out of the rear extension housing:
It'll slide out easy peasy.
If your yoke is leaking, it's probably a bit of a mystery as to how. The yoke starts as a steel tube, and it has splines machined into it to mate with the output shaft in the transfer case. They can't just leave it as an open tube, because every time the suspension cycles the yoke sliding on the output shaft will act as a piston and squirt transfer case fluid everywhere. To keep this from happening, they pressed a steel disc into the end of the tube and rolled a lip over it to seal it. Drivetrain parts live a hard life, and things can cause the yoke to deform a bit over time. Sometimes, your truck may have had a previous life in the orangutan exhibit at the zoo, and orangutans don't like leaks either (most of the time). The only tools orangutans know how to use are hammers, adjustable wrenches, and RTV, so they seem to just beat on it and grunt until it leaks more and they give up. At this point, they might smear RTV on it, and go fling poo at things hoping it doesn't leak any more. This is what my previous owner did, and as a result, it was leaking quite badly. The correct fix is to buy a new slip yoke, but a tranny shop suggested giving this a try, and it seems to have worked. Since it's cheaper than a new yoke, easier to find, doesn't require waiting for shipping, and a nice way to prolong the life of existing parts, here's how you fix it:
Hang the driveshaft from the rear u-joint so that the yoke points down. It'll probably still be dripping a little transmission fluid, so toss a rag or something down there to keep the floor clean. I hung mine from one of the pallet racks I use to store parts for my other cars using some large zip ties slung under the arms of the u-joint and hung over the top of the vertical of the shelf (I tried to take a picture, but my phone has developed a nasty habit of not saving the pictures I take for some unknown reason). The pressed in disc is under the u-joint. It's going to be hard to get at, but you can do it without disassembling everything. Clean the crap out of it; so clean that masking tape will stick to it and hold. This is important for a few reasons. The epoxy needs to hold, and masking tape is necessary to give the epoxy a wall and allow it to build a thick enough cap to make up for things not being perfectly level. When it's clean enough, you'll notice a shoulder toward the center of the yoke that is level with the pressed in disc (look at the photo below); this is where the tape needs to go to give the epoxy some space to build in case you weren't able to get the yoke to hang perfectly level. The way this whole trick works is that the epoxy seeks level, and so flows into all the cracks and such in addition to any surface adhesion. It fills everything, and prevents further fluid leakage. It's held up for a few miles now, so I'm cautiously suggesting it could fix the issue. With the tape in place, mix your epoxy and deposit it over the plate. There needs to be enough to completely cover it, but you obviously don't want epoxy spilling all over the place.
This is an after photo, but before it was cleaned up... Same phone issue as before.
While the epoxy is curing (you'll want the 30 minute stuff), go do the rest of the job, but for continuity's sake once the epoxy is cured, you'll take the file or razor blade and clean up the lip from the tape. Then it's ready to go back in the truck.
Meanwhile, back at the Hall of Justice, if you're just replacing the seal (and you should really do the bushing too, but just in case) you don't want a seal puller. I didn't realize how the seal was in there (didn't look too closely at the new one I guess), and spent a lot of time messing with it in the wrong way.

That red line is a lip where the metal cladding of the seal extends beyond the rear extension housing; just put the blade of a screwdriver behind it and tap it out with everything (save the drive shaft) still in the truck. No biggy. If that's all you're doing, put the new one in with a seal driver. A seal driver kit can be had for as little as $20, or you can usually rent one for free (with a deposit) from your favorite FLAPS.
If you're going all the way (I call it "doing it right"), you'll need to continue reading. At this point (since we're finally getting to the subject of the bushing), it is very much worth pointing out that the bushing I found at ALL the FLAPSes was wrong. The OD should be 2.01(something), but the OD on the bushings everyone was selling was 1.9(something) and just fell right through the housing. It's possible it's a model year thing. O'Reilly's website lists the part compatibility as being "82-88*", with the asterisk being "except '83". My truck is an '84 M1009, and the government's CUCV contract started in '83 (typically parts must be compatible across the entirety of the contract), and the date code cast into the housing was mid-'80. It's possible I just ordered the wrong bushing, though there were none listed for '83 or '80. I went to A-1 Transmissions down in Denver, and the guy said it was just the bushing for the TH400 for the larger gas engines. He gave me the bushing, two seals (my yoke is borderline on the sealing surface), a breather fitting so I can attach a line for water crossing, cleaned up the sealing surface, and installed the whole lot into the rear extension housing for $20; all with a smile.
First, if your transmission fluid is new(ish) and you want to save it, thoroughly clean out your oil pan and clean off the transfer case housing pretty much everywhere you can possibly imagine the fluid running from the bottom of the rear extension housing. Otherwise, you'll start by removing the speedometer cable

and speedometer gear housing retainer bolt (I believe it's 10mm). It's found on the PS top of the rear extension housing.

Put the cable out of the way somewhere, and the housing somewhere nice as well (you don't want to mess up that o-ring if you don't have to).
Next, take a 15mm socket and remove the rear extension from the transfer case. Unless you've already drained the fluid for a fluid change or something, have an oil pan ready to catch some transmission fluid.
The bolts are at the four corners of the circular housing. Up here by the speedometer stuff:

Opposite that on the top:

And then the two obvious ones on the bottom:

It may take some convincing with a deadblow if the sealant is newish, but it will ultimately just slide off:
Once you get it off, take a second to look around and familiarize yourself with what's going on. Understanding the beast goes a long way toward knowing what it needs to stay happy.
Most of what you'll see initially is just the pump housing. It will just slide right off (and may have come at least partially out with the rear extension housing).
Back side of the pump with its seal:

Pump guts, speedometer gear (both will just slide off the splines if you're curious, but be sure to put them back on in the same orientation), and sprocket/retainer/etc.
I feel pretty certain the reason for the orangutan abuse of my slip yoke was that it a) leaked quite badly after a botched u-joint replacement and b) was subsequently run completely out of fluid. As a result, I found a ring of what I believe to be friction welded metal shavings between the pump housing and the sprocket retaining hardware. It never hurts to have a look around.
Take the housing over to your work bench, and if you've gone this far, you probably didn't mess with pulling the seal in the truck (why bother?); pull the seal. The bushing is sort of difficult to get at. If you knock it in from the top, the bearing wont let it through, and you can't exactly get a seal driver through the bearing either. I ended up knocking the bearing out, and that gave me full access to the bushing (btw, this is another point where my camera took many pictures that it promptly forgot taking). It's difficult to get at from the back because it's so deep, and I was concerned about the soft aluminum housing not taking a beating very well. I messed with it for a bit before settling on the following solution: I found a long enough bolt, two washers, a nut, and the appropriate sized bearing driver, then grabbed a bar of 1/8" flat stock out of the scrap pile that was wider than the small end of the rear extension housing. I drilled a hole to fit the bolt in the flat stock, then assembled the mess into a simple bearing puller. It came out much easier than the seal did.
This is the only picture that saved, but I think it should be pretty apparent what I'm getting at. If anyone needs further illustration, I'll see if I can't reassemble it.

From here, it's all but the reverse of assembly. Drive the new bushing in (and debur it if necessary), install the new seal, and drive in the bearing. Clean up the mating surfaces between the transfer case and the rear extension housing. Note that there are notches in the rear extension housing that mate up with indexed tabs on the pump housing:
If you don't pay attention to this, reassembly could get a little messy or you could end up with the housing not fully seated or off kilter depending on how the tabs were indexed. I imagine it's even possible to break the pump housing tabs off since they're just plastic.
Put your RTV on the rear extension housing, then roll under there on your creeper and slide it all back together. The bolts are torqued to 25 ft.-lbs. Reinstall the speedometer stuff and torque the retainer bolt to 10 ft.-lbs. (you may consider doing this last if you'd rather not reset your torque wrench multiple times). By now, the epoxy has cured on the yoke, so go get it and slide the driveshaft back home, mate it to the diff, and torque those to 25 ft.-lbs. Go clean up the shop, maybe have a beer, walk the dog, what have you to give the RTV a few minutes to set up (it says it's ready to go back into service immediately, but I like to play it safe), then replace the transmission fluid (filter it first if necessary) and you're done!


 I looked up under a TH400, and the only seal I saw was smaller.


