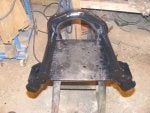
Nice job Vetter, looks like it will minimize torsional crank movement. IMO, it is one of the things that these blocks were lacking. We have tried this with straight 5 pin girdles and are happy with the results. There is a definite change in the harmonics when these engines are girdled up.
What are you going to use to bolt it on ? The first we did, we used new head-bolts shortened to correct length, the second was with ARP main studs. Now we are in the process of doing a third with girdle and ARP, and 3" of cement in the bottom of water jacket.
When building ours, we were very careful not to have binding of the bolts in their respective holes. Also, we do not have a mill or surface grinder either. so when laying it on, we first checked with a straight edge the tollerances in the level and flatness of the individual main caps in respect to each other. They were very close, so just checked the girdle for flatness. After it was laid on, torqued to 10 ftlbs and re-checked with a .002" feeler gauge between girdle and main caps. We removed the pan on one of our girdle motors after about 5000 miles. We did not see any cracks, abnormal bore wear or most importantly, no cracks. This block had boost spikes of 25-30 psi, and ran for extended periods over 15 psi boost.
Once again, great job...
")