Diesel Place banner

autometer boost gauge install

52K views 53 replies 26 participants last post by  rigwatcher  
#1 · (Edited)
after not finding a good write up i made my own .... here you go

parts needed

---autometer boost gauge ( or other as long as it has the 1/8npt fitting)

---1/8-27 npt pipe thread tap

---5/16 drill bit

---male 1/8npt compression fitting ( i just got the nylon hose kit from sunpro, available at autozone or advance)

you could probably find the fitting without getting the kit but i just got it because it was convenient at the time

this write up may be elementary to some, but im sure some will appreciate it ...

i appologize for the low quality cellphone pics... forgive me (hehe)

First, take off your upper intake manifold, theres 6 bolts on top, 2 sensors to unplug, and the hose and brace to the turbo.

Then decide where your going to have your boost source location, i chose the back right side, put your intake in a vise so its stable to drill, (if you dont have a vise you should go buy one immediately)
Image


This is a picture of the tap i got from SEARS

Image


be sure you have the intake in the vise so the surface your working with is flat, then drill the 5/16 hole where desired. put the tap in the hole with the tapping tool, make sure its level and with good pressure start turning the tap clockwise in the hole, this is the most crucial part to get right. the tap will begin to cut into the hole, making the threads. once you see the tap get through to the bottom a lil bit youll want to back the tap out and back in a few times to clear the new threads of metal shavings

Image


right here is about where you want to stop so you can make good use of the threads. since pipe threads are tapered you can make the hole a lil too big and the fitting wont fit as snug as youd like.

Image


back out the tap and make sure all metal shavings are cleaned up and this is what you get

Image


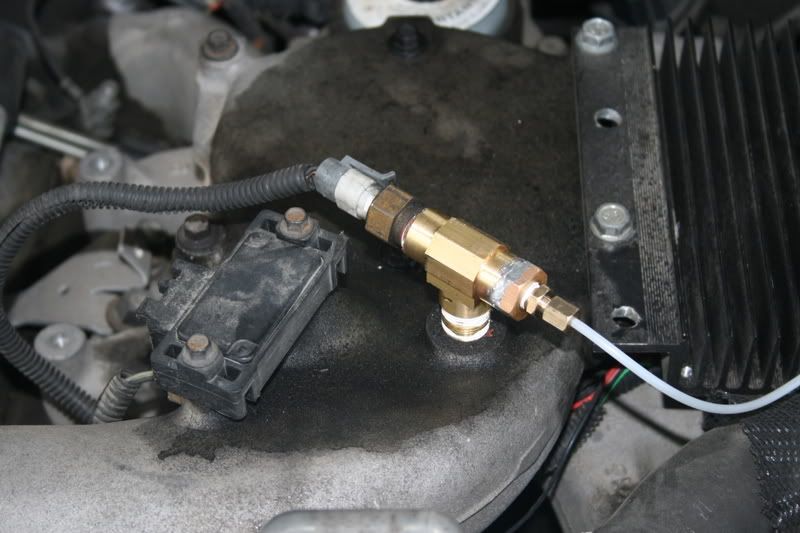
now get your male 1/8npt fitting and wrap some teflon tape around it. this will give it a good seal. screw in the fitting and DONT over tighten, cast aluminum is not the strongest metal!

Image


ill definitely finish up this article tomorrow, it got dark and i had to pick up some more things for my home made turbo master
 
#2 ·
Nice pics!! I installed mine a while ago but you will clear up many guys questions. Nice write up! Possibility for this to be in the FAQ??
 
#3 ·
Good write-up. Pipe dope is also a good alternative to teflon tape. Exposed tape in the system can break down and find its way into your motor. Found out the hard way in an airbag system on my gasser, cost me some valves. But its probably not a big concern in a diesel, should just pass thru harmlessly....just a thought...
 
#5 ·
Mine took about a half hour to install the 1/8 inch fitting in the upper intake. That includes removing the upper intake, drilling, tapping, cleaning the shavings out w/brake cleaner, and reinstalling. I mounted the gauge and ran the line the day before. It is a very simple installation and the boost gauge is a very valuable instrument.
 
#6 ·
anyone with general knowledge of mechanics can do this job in less than an hour easily

i am always SUPER careful not to get any teflon tape on the inside of whatever im using it on.... i learned the hard way on a paintball gun one time....
 
#7 ·
Well done, Nice write-up
 
#8 ·
Looks real good. Great documentation
 
#9 ·
I can't believe that your upper plenum is so clean!!! When I pulled mine to tap for boost it was so gunked up, I spent much time with it but still it never looked like that. Oh and the mess it made in the drive way I still get on my shoes and track it around!!! That stuff is nasty! On the plus side I found she picked up her performance after I cleaned it out, just wish it woulda cleaned up like urs did!
 
#11 ·
well for some reason i couldnt edit the original post but heres the final install pics.... not the prettiest place, but i like to see whats going on without even moving my head

Image
 
#12 ·
Great job, nice and clean... so far :D... How about an underhood pic with everything installed/routed?

This deserves a DIY sticky.
 
#13 ·
im definitely going back and routing the nylon tubing better its just sorta all over the place right now... the stuff doesnt really like to bend out of the circles it comes wrapped in

Image
 
#14 ·
Damn that's a clean engine bay... You live in there or what? ;)

My 95 had as much oil out side the engine as it did inside...
 
#17 ·
Simple Green & Hot water works for me, when was last time you did a hot water heater bottom blow, I hook my hose to that, squirt the engine down with SG and then use the hot water from opened hot water drain to rinse off the engine, kill 2 tasks with 1 work effort.

Good write up I'll add it to FAQ next to EGT install FAQ
 
#20 ·
Dunno if it's a common fitment to all the C/K series, but my truck has a square hole through the firewall, with a plastic clip-in plug in it.

Location is inboard of the steering column, from the engine side of the firewall, and above and forward of the throttle pedal, from the inside.

I popped mine out, and drilled it for the 1/8 line, then popped it back into it's position.

Better than trying to squeeze it through against the edge of bare metal, or where there were already a bunch of wires tight packed through a hole.

For the Canadians that live near a Princess Auto, they sell a pressure gauge install kit for about $5 that has the hose and two fittings, as well as a 1/4NPT to 1/8NPT reducer, for holes that got out of hand. :)

I went really cheap. I bought a 0-20 PSI 3" pressure gauge and hacked together an adapter for it. Some sticky backed velcro is going to hold it to the center console beside the transfer case shifter.

Cheers
Trev
 
#18 ·
Instead of drilling and tapping, I just pulled the boost sensor on top
of intake, went to Home Depot and got a tee and nipple, and
reinstalled it
 
#21 ·
yep thats where i routed it.... the engine bay was absolutely disgusting b4 i got a hold of it... i just let the truck get warm and covered the entire thing with engine degreaser.... after that just spray her down with the water hose and after 2 or 3 tries it should come fairly clean, oh dont forget to cover the electrical stuff. ( i just put a bag around my alternator and called it a day)
 
#22 ·
LOL, my engine isn't pretty like that, but this is what
I did to avoid drilling and tapping - which isn't hard, but GM
provides that handy port right there for you, so........

Image
 
#23 ·
has any one used just a standard air gauge to monitor boost? if that will work I have all the parts making a very cheep boost gauge!
 
#25 ·
Tookielee,

If I'd have seen that picture a couple weeks ago, I'd have done the same thing. Way easier, and no removal of the plenum (even though mine was in need of a cleanout anyway).

Cheapo gauge source. Got a welding supply place around? See if you can scrounge up an acetylene regulator delivery pressure gauge. It's usually 0-30 psi, with a quite suitable redline at the 15 psi mark. Just found one in my junk yesterday. Would've used it, instead of the 0-20 psi gauge I got from the surplus bins at Princess Auto, had I bothered to go looking through my own junk first.
I hate it when that happens! :-/

Cheers
Trev Jones
 
#26 ·
I dont know if this thread is still active, but its a great one....Im really glad that somone posted one with pics. I did the same exact install today, and the way you guys described it made it a lot easier.:)

I have one question though....when I was putting the cheesy nylon line on the brass T coming off the intake like tookie did...I lost the ferrule....thats little brass donut like thing...when i test drove it I am only getting like 5 psi of boost...I dont know if my turbo is bad ( I have suspected that ) or if missing that small piece really makes that much of a difference. The truck also seemed to run a little crappier......could it all be from this?
 
#28 ·
I lost the ferrule....
The truck also seemed to run a little crappier
The ferrule is what compresses against the line and holds it in, very good chance of blowing the line out without it.
Could be running worse because your IAT probe is no longer in the airstream.
Hasn't been a problem on mine, but I still intend to move it when I get
the chance
 
#29 ·
Well im kinda dumbfounded....when I say I did EXACTLY the same as you did,.....I mean I went to cheapo depot....and did it exactly the same...hell I even have an autometer gauge.

I just teflon taped the hell out of it, and took it for a ride...rides ok....but the gauge only shows an ocasional 5 lbs of boost at the most....is there any other way to test to see if its the turbo or the gauge?

Can anyone see why this setup wouldnt work?

Also, where is the easiest place to tap into to power the lights so that they come on with the dash lights?
 
#30 ·
Also, where is the easiest place to tap into to power the lights so that they come on with the dash lights?
You have to have the feral in there to seal the line, so if you don't have it in there you won't be getting the right reading. I have mine in a tee right now and it runs fine, I am going to move it as soon as i get my chip and eliminate my egr. Once you get the line sealed up you may still see irratic boost numbers without the TM. The computer on mine would cut the boost back really quick so it would rise up to 7 to 9 and then drop to 4 every time i stepped on it.
checker auto has a add a fuse that you can install in the fuse box (#14 in mine I think) and it will dim with the dash lights. No splicing. Just use a test light and run your dash light dimmer up and down until you find it.
 
#32 ·
Excellent Job. I'm going to do the same here. Sometimes people think that certain things are common knowledge and everybody would know how to do them, but it sure helps to see someone else's pictures of well done job. It maker's look less challenging. Thanks again.
 
#34 ·
well the IAT is metal on metal....but the fitting for the boost gauge is taped because my dumb ass lost the ferrule.

I could tap the intake, I just didnt want to get into all of that, and this seemed easier. Whats the IAT do anyway?