Diesel Place banner

LLY Injector Harness Repair

282K views 301 replies 188 participants last post by  bighawg  
#1 ·
Well, I've seen a few people asking so I thought I would put something together. Sideswiper was up the other day and we took a few pictures. I'll talk about his method and Gm's.

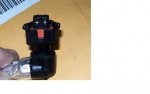
Let's talk about sideswiper's way first. It's quick and easy, and can be done on the side of the road if needed. #2 and #7 are the trouble makers. #2 is on the drivers side front, and #7 is on the passenger side rear. Both are accessible without removing anything. The picture below shows the #2 injector.
 

Attachments

#2 ·
The easiest way I have found to remove the harness from the injector is to apply a little pressure as if you were assembling it, then press down on the tab that my arrow points to. Once the tab is depressed simply remove the connector.
 

Attachments

  • Like
Reactions: Skipper56
Save
#3 ·
Now with the connector unplugged its time to work it up where you can get your hands on it good. Take an ice pick or a scratch awl and line it up with the slot. In the picture below I have marked each location with a cross-hair.
 

Attachments

#4 ·
This next part can get you hurt, so be careful here.

Take the ice pick and force it clear through the connector. It doesn't have to poke clear out the other side, but you must be sure you went clear though the internal spade connector. This creates a new "crimp" to once again fit tight on the injector. Now simply reinstall the harness and your done. Thanks Scott AKA sideswiper!!
 

Attachments

  • Like
Reactions: Skipper56
Save
#5 ·
Now lets talk about GM's fix, harness service kit part # 980117958.

Below is the kit as it comes from the General. The replacement harness at the top of the picture is for #7 and the one at the bottom right is for #2. Also the larger bracket on the left is for #7, and the smaller one on the right is for #2.
 

Attachments

  • Like
Reactions: Skipper56
Save
#208 ·
Do you know the part number for Partzoneonline? I looked all over their website and couldn't find it. I can't go through gm parts direct cause i live in canada and the dealer always wants an arm and a leg
 
Save
#6 ·
Lets talk about #7 first. Start by removing the inner fenderwell, but taking the filter mount off and moving the filter out of the way will make it a little easier.

The bracket bolts on to the valve cover in existing holes using the two new bolts. Now plug the new harness in to the injector. It has plastic plugs that snap into the holes in the new bracket. This supports the harness completely. After the bracket and harness are installed simply cut the wires and use the butt connectors provided. All but the wire splicing I did from the top. I also soldered and shrink wrapped mine. I did it several months ago so the parts are a little dirty in the picture.
 

Attachments

  • Like
Reactions: Skipper56
Save
#7 ·
#2 is even easier.

I removed the red electrical junction box marked battery(+) and it's mounting bracket from in front of the valve cover. Once again I connected the new harness to the injector first, then bolted the new support bracket to the existing hole using the existing bolt that supported the old harness. Wire tie the harness to the bracket and make your wire connection the way you prefer.

Reinstall all the parts. That's it, your done!
 

Attachments

  • Like
Reactions: Skipper56
Save
#8 ·
Rick,

Do you have any idea what the GM fix costs? I know local dealers may have different markups, but just so I can get an idea.

Thanks.
 
Save
#10 ·
When I checked on this last week, the connector kit is on backorder, some various dealers around the nation came up on the parts locator as having 1 or 2 in stock, but not alot.

part# 98017958

gmpartsdirect 156.88 shipped (unless you are NC resident have to add tax)

List price from a dealer for the kit is 216.00
 
#11 ·
Nice job - thanks for the info!!
 
Save
#12 ·
So, are you saying the bottom-line problem is a bad connection between the harness and the injector? I thought the issue was the wiring inside the harness was being pulled away from its connector, but your fix makes it sound like we just have a "disconnect" between the connectors themselves.

Thanks,

Joseph
 
Save
#14 ·
MY "FIX"should last the life of your truck.i had 100000 on my first "fix".when i swapped motors it came with a harness on it and it did the same thing.it has had the "fix" for 40000 miles so far without any recurrence.i would definatly try my fix before i spent 216.00.you have nothing to lose since its free.
 
Save
#15 ·
THANK YOU SIDESWIPER ! ! ! This is exactly the kind of solution I was waiting for. I haven't had a problem, but I intend to travel into the wild and this had me very concerned.

I already did the heater-hose cushion for the harness at the FICM to prevent rubbing through. Now I just need to buy an ice pick for the 2/7 connectors and I'm all set! (Well, besides doing JB Weld on the T-case and carrying a spare fuel filter.) Thanks again.
 
Save
#16 ·
I thought the 2/7 injector harness failure mode was a broken wire at the injectors? Or is this a different problem all together?
 
Save
#17 ·
no the broken wire is a rub through problem on bracket.the 2-7 problem is a bad connection at the injector.eventually it happens to all of them.i have had them all set a code.the ones i didnt go ahead and fix before it happened.
 
Save
#18 ·
Hmm, interesting! I've had my ficm wiring rub through on the bracket before...freaked me out when it started snowing soot from my exhaust pipe.

I guess I'll be performing this "fix" at my earliest convienience :) Thanks Sideswiper!
 
Save
#19 ·
If I were to get a 2/7 connector failure, and I then performed the ice pick trick to fix it (let's assume I didn't fix it until I had a problem) . . . will I have to reset the codes before she runs right again?

I don't care about whether a CEL stays lit up but I want to return to full power. Do I need to buy and carry something (an OBDII tool with reset capability, or ???) along with the ice pick?

Thanks.
 
Save
#20 ·
jake111;1667205; said:
If I were to get a 2/7 connector failure, and I then performed the ice pick trick to fix it (let's assume I didn't fix it until I had a problem) . . . will I have to reset the codes before she runs right again?

I don't care about whether a CEL stays lit up but I want to return to full power. Do I need to buy and carry something (an OBDII tool with reset capability, or ???) along with the ice pick?

Thanks.
Hey!

That is a very good question and seeing I was planning the same avenue of attack I wish someone would answer Jake111's post!
 
Save
#21 ·
I recommend every one carry a scanner if possible. As far as this issue, IIRC the ecm will reset itself after so many cycles. Hopefully someone else will confirm this.:)
 
Save
#22 ·
Rick, & Sideswiper thanks for your efforts putting this together.
Mine hasn.t acted up yet, but sounds like it will.
AJ
 
Save
#23 ·
Any Idea why #2 and #7 only when all the connectors are probably the same spades?
 
Save
#25 ·
sideswiper;1694691; said:
they have the most sidesways pull on them,but i have had others.with enough miles I believe they will all do it sooner or later.
I think you're probably right. I believe I will apply your method on one of mine to make sure I know how to do it and carry the tool for the day when I have to do it on the side of the road. I'm thinking that there is a risk of messing it up and don't want to go jabbing all eight and create a big problem.


Those spade type connectors are prone to corrosion because they are effectively open to the atmosphere at the end. The only connections are at the points where the female side curls in and just opposite to that, one point on the other side. Everything else is just incidental contact. The female side is essentially a spring and will relax over time. Pokin the ice pick through it effectively overcomes the relaxation and restores the tension.

Any idea what voltage is being carried there? On the equipment I work on, that type of connector is only used on AC line and very high (many hundreds) voltage DC. With lo-volt DC, a little corrosion goes a long way.

We use a contact cleaner at work (Deoxit) that is also sold at Radio Shack. I'd swear the stuff is tranny fluid. Anyway, it cleans quite well and leaves a little oil in the connector as a corrosion preventative. It works pretty well on the 5 to 50 VDC connectors. It might be worth it to squirt them all down. I don't think it could hurt anything, the Deoxit that is. Don't squirt tranny fluid in there!
 
  • Like
Reactions: saskberg
Save
You have insufficient privileges to reply here.